Our modern environment has conditioned us to move quickly and buy or get things NOW. While I admit to falling prey to clever advertising ploys from time to time, my life as an artist has shown me that faster is not always better when it comes to finishing a painting.
A now-famous 1972 Stanford marshmallow experiment was a study on delayed gratification led by psychologist Walter Mischel, a Stanford University professor. In this study, a child was offered a choice between one small but immediate reward, or two small rewards if they waited for a period of time. During this time, the researcher left the child in a room with a single marshmallow for about 15 minutes and then returned. If the child did not eat the marshmallow, the reward was another treat of their preference. In follow-up studies, the researchers found that children who were able to wait longer for the preferred rewards tended to have better life outcomes, as measured by SAT scores, educational attainment, and other life measures. (It must be noted that this study was somewhat debunked because it turns out that one's economic background, rather than willpower, has more to do with a positive life outcome).
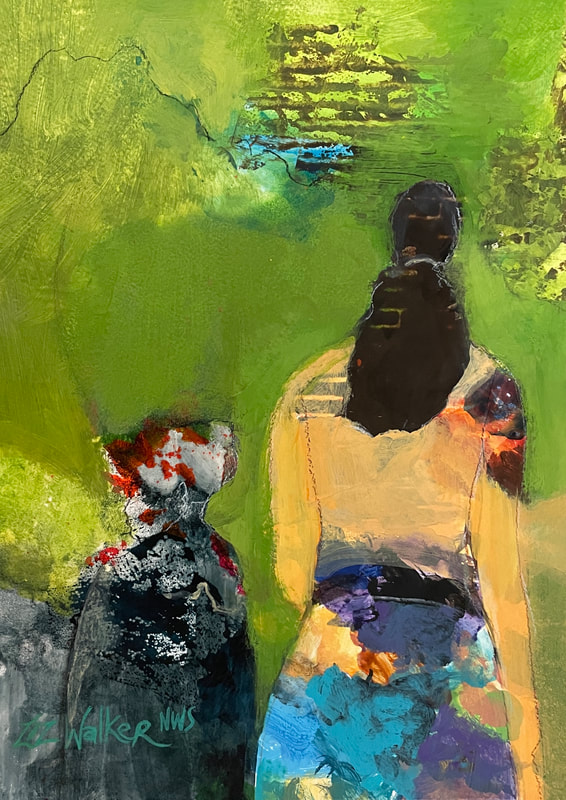
All of this is to say that I've learned over the years that just because I WANT a painting to be done, doesn't make it so. It's not even about being a perfectionist or a procrastinator--it's that my standards are a lot higher than they used to be because when I KNOW better, I DO better (as the saying goes). Such is the case of my painting "Winds Of Change" which I began in 2021 and finally finished last week! It went through many iterations--mostly having to do with the upper right quadrant of the painting (the figure's hair and the circle behind her). It languished for months as I worked on other paintings, but I kept coming back to it to try and figure out what was wrong/missing and how to correct it.
I finally showed the painting to a critique group this fall, and someone mentioned that the figure was so strong and full of movement, the hair needed to match that intensity of color and flow. (Why didn't I think of that?). There was no way I was going to attempt to hand-paint strokes of color in her hair, so I decided to try to find collage paper that would do the trick. I looked through my hand marbled papers to find a pattern/color that would fit with the rest of the painting (not an easy task). Lucky for me, I save all sorts of marbled paper scraps, and I found the perfect one! I cut out a tracing paper template of the hair shape and used that to cut out the paper so it would fit perfectly over the existing hair. I taped it in place and photographed the piece to see if it looked right. It did! Then I carefully glued it into place and after it was dry, I photographed the finished painting. My patience (and ability to heed a valid criticism of my painting) paid off. Two years after I started it, "Winds of Change" is now finally complete (and no marshmallows were involved!).
A now-famous 1972 Stanford marshmallow experiment was a study on delayed gratification led by psychologist Walter Mischel, a Stanford University professor. In this study, a child was offered a choice between one small but immediate reward, or two small rewards if they waited for a period of time. During this time, the researcher left the child in a room with a single marshmallow for about 15 minutes and then returned. If the child did not eat the marshmallow, the reward was another treat of their preference. In follow-up studies, the researchers found that children who were able to wait longer for the preferred rewards tended to have better life outcomes, as measured by SAT scores, educational attainment, and other life measures. (It must be noted that this study was somewhat debunked because it turns out that one's economic background, rather than willpower, has more to do with a positive life outcome).
All of this is to say that I've learned over the years that just because I WANT a painting to be done, doesn't make it so. It's not even about being a perfectionist or a procrastinator--it's that my standards are a lot higher than they used to be because when I KNOW better, I DO better (as the saying goes). Such is the case of my painting "Winds Of Change" which I began in 2021 and finally finished last week! It went through many iterations--mostly having to do with the upper right quadrant of the painting (the figure's hair and the circle behind her). It languished for months as I worked on other paintings, but I kept coming back to it to try and figure out what was wrong/missing and how to correct it.
I finally showed the painting to a critique group this fall, and someone mentioned that the figure was so strong and full of movement, the hair needed to match that intensity of color and flow. (Why didn't I think of that?). There was no way I was going to attempt to hand-paint strokes of color in her hair, so I decided to try to find collage paper that would do the trick. I looked through my hand marbled papers to find a pattern/color that would fit with the rest of the painting (not an easy task). Lucky for me, I save all sorts of marbled paper scraps, and I found the perfect one! I cut out a tracing paper template of the hair shape and used that to cut out the paper so it would fit perfectly over the existing hair. I taped it in place and photographed the piece to see if it looked right. It did! Then I carefully glued it into place and after it was dry, I photographed the finished painting. My patience (and ability to heed a valid criticism of my painting) paid off. Two years after I started it, "Winds of Change" is now finally complete (and no marshmallows were involved!).
 RSS Feed